
Welcome to Bottle for Dummies!
TThis guide is directed to people who don't know the good and bad points of using a bottle. This is a basic and simple guide, so if you have been playing the game for a while or have experienced DotA before, you probably won't find anything new here.

1.0 - Basics
This item contains 3 charges and can be found on the ''Supply'' section of the shop. Each charge heals for 135 life and 70 mana over 3 seconds with a 0.5 seconds cooldown, but when attacked, the effects are dispeled. This item costs 600 gold. ''Wait, isn't that little? So, basically I just waste 600 gold in an item with only 3 charges capable of restoring up to 405 life and 210 mana maximum? Not worth it!'' This is where people are wrong.
Listen, you don't use all charges at once! You can select when to use a charge of the bottle. ''Wait, so I can use a charge now and recover 135 hp and 70 mana and then a charge in like 10 min?'' Exactly!
1.1 - Recharging
''Recharging?'' Right again! ''Wait, so I can recharge my bottle and make it have free charges again!?'' Yes! ''But how to recharge?'' Simple! You can recharge your bottle at the well or by capturing a rune. ''Wait, what? HOW? I can put runes inside my bottle? How does the fountainr rechar-'' Calm down! Everything at its time!
Let's start with recharging your bottle using the well. To recharge your bottle at the well, all you have to do is go to the well and once there your bottle will recharge by itself. So you'll have 3 charges on your bottle once again!
1.2 - Capturing Runes
This is simple. When you want to bottle a rune, all you have to do is use all your charges in the bottle, click on the bottle on your inventory slot and then click on the rune. Presto! And there you go!
To use the rune in the bottle, all you have to do is click it and the rune's power will start working. Storing runes in the bottle and using them whenever you want is always a good strategy.
Also, when runes are stored in your bottle and then used, you gain 3 charges! So your bottle is refilled!
Reminder: Runes respawn every 2 minutes.
2.0 - Laning and Bottle
''Say what?'' Yes, bottle and laning are combined words in your Heroes of Newerth dictionary. At the start of the game when choosing which lane to go (top, middle, or bottom) keep this in mind: lanes affect bottle's performance.
If you are leveling at top lane, you are only going to get runes at the top part of the river on early game. Bottom is just the opposite, you are only going to get runes at the bottom part of the river on early game. Now that would lead middle lane to advantage, because both top and bottom runes are equally close to it, so it can bottle runes from bottom and top parts of rivers with ease. So, if you are going bottle, keep that in mind, for that might come in handy.
Oh, right, for those of you that don't know what river I'm talking about, it is that piece of water that divides the map in half. It separates Legion's land and Hellbourne's land.
2.1 - Courier
Yes, courier is extremelly helpful and is your bottle's best friend. ''But why would I need a courier?'' While you are leveling in your lane, you have no charges in your bottle, there is no need to go back to the well or go looking for runes to recharge it! Just make your courier do it! Buy the monkey courier and give him your bottle, you can choose either to go to the well and recharge it there, or find a rune and bottle it. That way you won't loose exp, gold, and time.
It is also good to upgrade your courier to a flying courier. Flying couriers have two abilities:
TThis guide is directed to people who don't know the good and bad points of using a bottle. This is a basic and simple guide, so if you have been playing the game for a while or have experienced DotA before, you probably won't find anything new here.
1.0 - Basics
This item contains 3 charges and can be found on the ''Supply'' section of the shop. Each charge heals for 135 life and 70 mana over 3 seconds with a 0.5 seconds cooldown, but when attacked, the effects are dispeled. This item costs 600 gold. ''Wait, isn't that little? So, basically I just waste 600 gold in an item with only 3 charges capable of restoring up to 405 life and 210 mana maximum? Not worth it!'' This is where people are wrong.
Listen, you don't use all charges at once! You can select when to use a charge of the bottle. ''Wait, so I can use a charge now and recover 135 hp and 70 mana and then a charge in like 10 min?'' Exactly!
1.1 - Recharging
''Recharging?'' Right again! ''Wait, so I can recharge my bottle and make it have free charges again!?'' Yes! ''But how to recharge?'' Simple! You can recharge your bottle at the well or by capturing a rune. ''Wait, what? HOW? I can put runes inside my bottle? How does the fountainr rechar-'' Calm down! Everything at its time!
Let's start with recharging your bottle using the well. To recharge your bottle at the well, all you have to do is go to the well and once there your bottle will recharge by itself. So you'll have 3 charges on your bottle once again!
1.2 - Capturing Runes
This is simple. When you want to bottle a rune, all you have to do is use all your charges in the bottle, click on the bottle on your inventory slot and then click on the rune. Presto! And there you go!
To use the rune in the bottle, all you have to do is click it and the rune's power will start working. Storing runes in the bottle and using them whenever you want is always a good strategy.
Also, when runes are stored in your bottle and then used, you gain 3 charges! So your bottle is refilled!
Reminder: Runes respawn every 2 minutes.
2.0 - Laning and Bottle
''Say what?'' Yes, bottle and laning are combined words in your Heroes of Newerth dictionary. At the start of the game when choosing which lane to go (top, middle, or bottom) keep this in mind: lanes affect bottle's performance.
If you are leveling at top lane, you are only going to get runes at the top part of the river on early game. Bottom is just the opposite, you are only going to get runes at the bottom part of the river on early game. Now that would lead middle lane to advantage, because both top and bottom runes are equally close to it, so it can bottle runes from bottom and top parts of rivers with ease. So, if you are going bottle, keep that in mind, for that might come in handy.
Oh, right, for those of you that don't know what river I'm talking about, it is that piece of water that divides the map in half. It separates Legion's land and Hellbourne's land.
2.1 - Courier
Yes, courier is extremelly helpful and is your bottle's best friend. ''But why would I need a courier?'' While you are leveling in your lane, you have no charges in your bottle, there is no need to go back to the well or go looking for runes to recharge it! Just make your courier do it! Buy the monkey courier and give him your bottle, you can choose either to go to the well and recharge it there, or find a rune and bottle it. That way you won't loose exp, gold, and time.
It is also good to upgrade your courier to a flying courier. Flying couriers have two abilities:
- One that increases their movespeed for a short duration of time.
- One that grants them invulnerability for a short duration of time.
Reminder: The monkey courier costs 200, and to upgrade it to a flying courier you must have the following requirements:
- 200 gold.
- Have the recipe in your monkey courier's inventory slot
- Use the monkey courier's only spell to make him a flying courier.


2.2 - Wards
Wards are one of the bottle's best buddies. Buy wards and leave them close to the runes spawn points, so you'll know which rune spawned and where (top or bottom). Even though they are invisible, enemies who are using sight-seeing itens can destroy them when they spot them.
Heroes who have benefits in this are both ''Keeper of the Forest'' and ''Scout''. Keeper of the Forest can put an eye on a tree to watch a rune spawn point and Scout can put an ''Electric Eye''.
Note:
- The eye on the tree is revealed to the enemy and is destroyed if the tree is destroyed (Runes of Blight can destroy it)
- The ''Electric Eye'' is revelead once an enemy ''steps on it'' (if they are really close to the eye, it is revealed).

3.0 - Runes
There are x types of runes in the game: Invisibility, Regeneration, Double Damage, Haste, and Illusion. All of them will be explained now.
Note: Always look at the timer to know when the effects will end.
3.1 - Invisibility
Will make your hero go invisible when used. This is good for ganks and escaping. When you are almost dying and when you are trying to escape from the enemy, remember to use this rune if it is inside your bottle or if you find it at the river. It is definately one of the games' best ''life savers''.
3.2 - Regeneration
This will regenerate your hero's mana and HP to max in a short period of time; however, this effect dispels on damage and when you reach max, so use it wisely. The effect takes a while to go off, so, if you are not being attacked and if you are full, feel free to use your nukes, for the regeneration buff will recover you back to max again.
3.3 - Double Damage
This rune will double your damage (multiply it by 2x), it doesn't affect magic spells, but it does affect your critical damage (your critical strike damage will be doubled).
3.4 - Haste
This rune will increase your hero's movespeed to maximum (522). Great for chasing heros and escaping from the enemy. Remember to use this wisely.

3.5 - Illusion
This rune will create two duplicate images of your hero. They cannot cast spells, they take more damage from enemy attacks and deal less damage than your hero. This rune is great to confuse your hero and play mindtricks on them to make them use spells at your illusion and make them go on cooldown and make them waste their ultimate spell and/or mana, making it a perfect time for a gank.
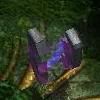
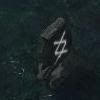
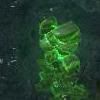
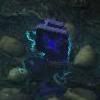
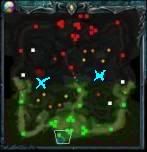
3.6 - Location (Thanks _Archangel_ for the pictures)
Forests of Caldavar

Darkwood Vale
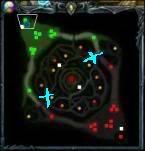
Watchtower
(If you are looking for more info on runes, check out this guide Using Bottle
4.0 - Types of Heroes and How Bottle is good for them!
This section will comment on each type of hero and how they work with bottle. The following types of heroes will be commented on: Nukers, Support, Tanks, and Late Game. The runes that are best for each hero class were analized (in other words, if you have a team with one of each class, and you could choose which rune to give to each of them, you would).
4.1 - Nukers
Early game nukers such as Thunderbringer suffer from low mana regeneration and a low mana pool. Bottle will basically guarantee a good early nuke, and good chases and escapes at mid game and maybe late game. Nukers get benefited with almost every rune except ''Double Damage''. ''But why not Double Damage?'' Simply because Nukers most of the time have small attack power and speed in mid and late game.
Also, most of the time, Nukers go middle lane. So they get a good position and are close to both of the rune spawn points. Best runes: Haste, Regeneration, Invisibility.
4.2 - Strength Heroes
Constantly running out of mana, this type of heroes work very well with bottle. They usually are always requiring mana. Good examples of Strength heroes that works well with bottle are Pharaoh and Jereziah. Strength heroes have fast health regeneration, and they can go out of battle and come back in a quick ammount of time, bottle will speed up your process, and make them be able to go back to the battle completely. Most strength heroes are called ''starters'', cause they start the battle. Good examples of starters are Kraken and Keeper of the ForestBest runes: Regeneration, Invisibility(easier to start the battle), Haste(improves their ''starting'' ability and timing), Illusion(good for tricking someone to make them use spells on the illusion or to not know which one to focus attacks on battle).
4.3 - Agility Heroes
Agility heroes suffer from low max health and low mana max. They have slow regenerations for both as well, so they get really benefited from the bottle's recovery. Agility heroes work awesome with all the runes on the game, of course, they have their best runes as well. Best runes: Regeneration, Double Damage(agility heroes usually have more damage and attack speed), Illusion(since they attack faster and deal more damage, illusions will work better when attacking).
4.4 - Additional Info on Starters
All starter heroes are included in: Intelligence and Strength (examples: Tempest and Behemoth). These heroes get the benefited the most from bottle, since they most of the time have spells/skills that give your team more advantage over the other, so they must always be ready to fight, cause they server as great supporters. If you notice these kind of hero is dying, try to help him, for he is essential in your team. Best runes: Invisibility, Haste, Regeneration.
5.0 - The Battle for the Runes
Having a rune available to you is a great advantage, so you have to be at the constant lookout for runes. Checking every 2 minutes for runes at their spawn spot is very important. Wards, spot revealing abilities (such as Electric Eye [Scout]) are also good, even using your courier to check it and even maybe getting the rune for you is a good idea.
However, the rune spawning spots are dangerous, the enemy team will also be checking there frequently for a boost at team battle. Another tip is to never leave the rune ''about'' for too long. If no teammates are going to get it, get it, even if you don't need it, so the enemy doesn't get advantage (example: getting regeneration rune at full health).
This guide is from: Heroes of Newerth Forum
No comments:
Post a Comment